 |
| this is Pepper helping out |
 |
| the two kittens love to get in the pictures |
 |
| Ginger getting groomed for her close-up |
 |
| this is Gingers manager/agent Henry |
 |
| now everyone is getting in the shot |
 |
| we really know who the star is in this one. |
|
| this is Pepper helping out |
|
| the two kittens love to get in the pictures |
|
| Ginger getting groomed for her close-up |
|
| this is Gingers manager/agent Henry |
|
| now everyone is getting in the shot |
|
| we really know who the star is in this one. |
 |
| Well this is the finished product, I hot glued the flowers and brushed a "diamond wash" over all the frames. |
 |
| you can see the diamond wash better here. I combined water, glue, and glitter in a jar and brused the wash all over the frames. |


 |
| I got these frames from my dear friend Ginny |
 |
| I cut backgrounds for the frames |
 |
| I used some cardboard to cut out the letters to my daughters name. |
 |
| I painted the frames and letters a variety of colors using acrylic paint. |
 |
| here are the letters in the frames |
 |
| I pulled out the punches it was time to make some flowers |
 |
these are the shapes I used. |
 |
| for me I choose the colors I want the paint the flowers, then punch out the shape and then paint them. I used to paint after I assembled the flowers but the petals stuck together and I was having to use my heat tool a lot. |
 |
| after the shapes are colored I punch a hole for the brad and layer the shapes |
 |
| a tip: start with the smallest shape first then add as many petals as you like. |
 |
| using a variety of shapes and kinds of paper you get a different looking flower |
 |
| this is a sample of what is to come. I love the bling on the letter, Camille came up with that one. |
Well I got a huge jump start (for me) on my Halloween Stamp Club challenge. I am having a good day just letting the creative juices flow. Kids are letting me play, husband is busy doing other things. I picked up some really cute things at the dollar spot at Joanns last night. They have paper, stamps, ink, ribbon, and even some tiny punches( I resisted them). Here's what I came up with so far.  |
| This is a black card with a semi circle of yellow for the moon. I stamped the bat and embossed it in black. I stamped the sentiment and cut out some of the candy corns from the patterned paper. I made a ruffel from the patternded paper and added orange ribbon. The bat and sentiment are popped up with mounting tape. |
 |
| this started from an orange card, I punched the "fence" piece from a Martha Stewart punch (I got at Ross for 4 bucks YEAH!) I used embrodery floss for the bow. I embossed the bat in black and gold glitter. I distressed the edges using my black stamp pad. The sentiment and bat are popped up. |
 |
| This one is on the same orange paper, I folded a book page like a fan, and sponged it in orange and black. I used the same punch to make the fence. The moon is stamped and cut out and mounted. I samped the bat in black and popped it up. I free handed the spider web. |
 |
| here they are as a trio. |
 |
| I got help from my sweet and very talented daughter. She came up with the idea that we should use the same supplies and make each others card. It was a wonderful idea and was a total success. |
 |
| this is hers for me. |
 |
| here they are together |
 |
| I also had help from Nenis. |
 |
| I stamped the spiderweb for the background on purple carrdstock, created a ruffle from patterned paper added glitter and embrodiery floss, I stamped the pumpkin and cut out. I stamped the sentiment and layered patterned and cardstock paper. To make the card pop I added some purple bling. |
 |
| I embossed the web in silver and the sentiment too. I stamped the bat and pumpkins and cut out. I punched out the banner and stamped boo on it. |
 |
| I added back ground stamping and embossing, to break up all the white space. |
 |
| had some help from Ginger |
 |
| I used a small doilley(sp) to mask some of its lacy shapes, I did it in pink here |
 |
| I masked in light blue here |
 |
| I hot glued the embellishments here, it took quite a while because my OCD took over. I finally just had to glue the first one down and go from there. I freed myself as I call it. |
 |
| the judges agree that they really like my piece. |
 |
| close up on the wall |

 |
| Punched flowers using glossy colored book paper. |

 |
| here is a layered flower using mulberry paper and book pages |

 |
| clear embossed butterfly stamped on black paper |
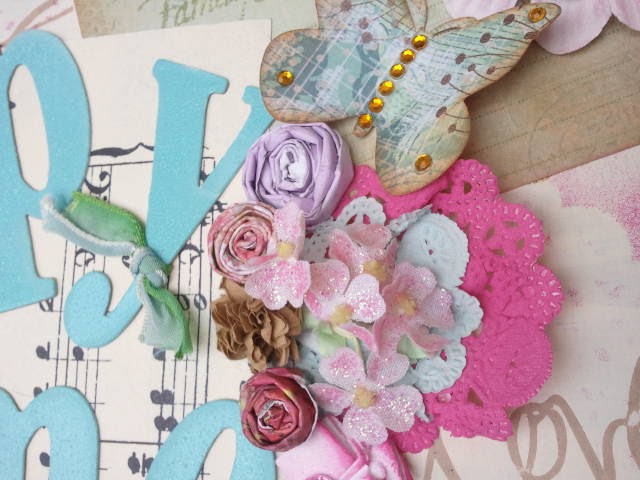 |
| most of these are rolled pattern paper flower roses, also you can see the doilley I used in the masking process. Nothing ever waisted. |


